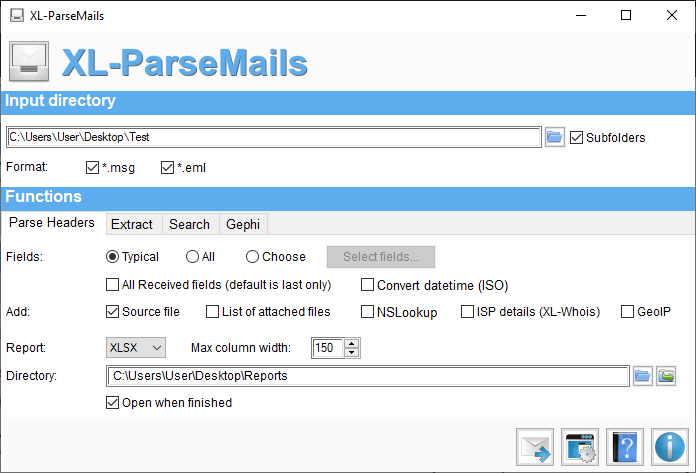
Input: Input must be a folder that contains .msg and .eml files.
You can include subfolders or not.
Functions: Action to apply on selected files. See Functions section for details.
Footer: The footer contains information about the state of the process and buttons:
Process, Settings, Documentation and About. When the
Process is disabled, you can move your mouse over the Not Ready? Look Here to see
message what is missing.
Functions
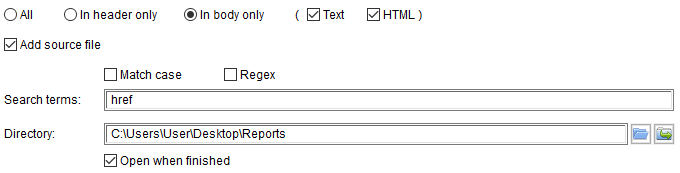
There are four tabs: Parse Headers, Extract, Search and
Gephi.
Parse Headers
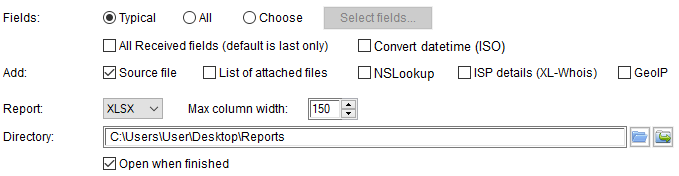
Parse and extract fields from email headers and generate a table report (XLSX, HTML or CSV). Options:
Fields: You can select:
Typical: Preselected fields that can be set in Settings.
All: A column is created for any field that is found. You should get a
very big table, but you won't loose anything!
Choose: Select the fields you want from a list. You can also select the order
of the fields.
All Received fields: If you check this option, all received field values will be
included and numeroted in the results. Default is to keep the last received value only, which is
presumed to be the first in the SMTP communication as you may know.
Convert datetime (ISO): In a email header, date and time may be provided in multiple
timezones. If you check this option, all datetimes will be replaced by their ISO representation in
local timezone (ex.: 2010-01-01 12:55:28 -0400). This format is easily recognized by other tools like
spreadsheets. The local timezone can be changed in Settings.
Add: Add columns to the table:
Source file: It will be the first column. It contains the email file path.
List of attached files: List of all attachments in the email.
Nslookup: A host or domain name for each parsed public IP address. An active
internet connection is required for this option.
ISP details: ISP for each parsed public IP address. You must have a valid
XL-Whois database to use this option.
GeoIP: GeoIP details for each parsed public IP address. You must have a valid
GeoIP database to use this option.
Report: This is the folder where the report will be saved. The folder is automatically saved.
Available report formats are XLSX, HTML or CSV. For XLSX, you
can set the maximum width of a column. Wrap text will be used to show all the data. For CSV, you can choose the
separator to use (tabulation, ,,
; or |).
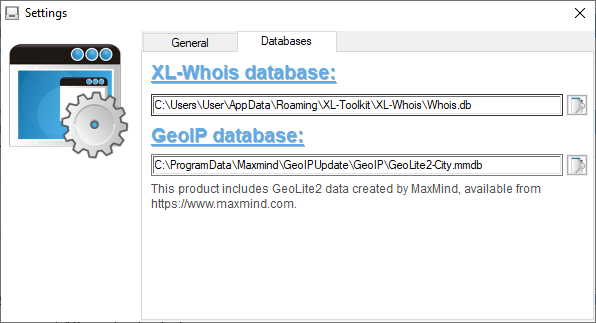
Extract
Extract any part of emails like headers, body or attachments. This function may generate a file for each
extracted part ([Source filename]_headers.txt for headers, [Source filename]_extracted.txt for body in text, [Source
filename]_extracted.html for body in HTML, [Source
filename]_[Attachment filename]). Options:
Headers: Extract the header of the email. You can select fields like in the
Parse Headers tab.
Body: Based on the email format, the body may be available in plain text and/or in
HTML. If you check the Merge Headers and Body, extracted header fields will be added at
the beginning of [Source filename]_extracted.txt and the file for
the headers will not be generated.
Attachments: Extract attachments of each email. You can select All,
Images only (based on MIME type: image/*) or
By extension (list of file extensions, separated by comma, ex.: .pdf,.docx,.xlsx). If you check Include source in filename,
the attachment will be renamed (ex.: email1_attach1.jpg).
If the body of the email contains SMTP message (ex.: 550 Non-existent email address), it will be added
to the Body (text only, if you checked it), as well as the original message that could have
been attached.
To get and show inserted images in HTML, you must check attachments.
Search
Search for keywords or regular expressions in any part of emails and extract results. If you want to
search for multiple keywords, you can use a regex like this:
The color of the border indicate if your regex is valid or not. The report will contain lines that match
your keyword or regex, or extracted data, if you use capture group(s). Some examples:
Extract email addresses with ([\w\.\-]+@[\w\.\-]+\.+[a-zA-Z]+):
Extract URLs with (http:.+?)(?:\s|\"|>|<|$):
Gephi
This function is experimental. Gephi is an open-source network
analysis and visualization software. To easily create a graph with Gephi, you can import data from two
files: Nodes.csv and Edge.csv. Take a look at this video to see how. The function in this tab can generate the data for this. Example
with Received hostnames and Email
addresses showing a message sent from a hotmail to a gmail address:
Received: If you want to create a graph that will illustrate the path followed
by an email, you should check this one. All the servers involved in the SMTP communications
(Received fields), will be used as nodes (Received_Node.csv).
The file Received_Edge.csv will also be generated. Options are:
IP addresses, Hostnames or Both:
In Received field, you usually find an IP address and a hostname for each server.
When an email is transfered from one network to another, it may use a different IP address
for the same server (hostname). So selecting only IP address or
Hostnames will show a different path, as it will reduce the number
of nodes involved.
From, By or Both: A typical
Received field usually include the exchange between two server: the
one that received the email (By) and the one that sent it
(From). From one Received field to another, the
server is usually the same, as "A" send to "B", "B" send to "C", and so on. So selecting
only By or From will show a different path, as it
will reduce the number of nodes involved.
Emails: If you select Received AND Emails,
the email addresses (To and From fields) will be added to the
Received graph, but if you check Emails only, it will generate
the files (Emails_Node.csv and Emails_Edge.csv) for email adresses only. That could be
interesting if you want to show the communications between many addresses. Option:
Name, Address or Both: In
To and From fields, you usually find the name and the
email address of the user. As the same name may be used with different addresses, or the
same address with different names, selecting only one may reduce the number of duplicates.
Settings
General
In Tool section, we have the following functions and options:
Open user dir: This is the directory where settings are saved. Copy the content of
this directory if you want to backup your settings.
Check Update: Check on le-tools.com
if a tool update is available.
Check for update at startup: When XL-ParseMails starts, check on website for available
update of the tool.
Open log file: The log file (XL-ParseMails.log) is located in the user directory. It
is created when logging is enabled. It contains messages about errors that could happend when using the tool.
Enable logging: Enable or disable logging of errors.
In Functions section, you have the following options:
Parse headers typical fields: Select fields to be used with Typical
option in Parse Headers tab.
Extract Typical fields: Select fields to be used with Typical
option in Extract tab.
Convert 6to4 addresses to IPv4: An IPv6 address that is used with 6to4 tunneling. An
IPv4 address is appended to the prefix 2002::/16 to create the address. More information
on https://en.wikipedia.org/wiki/6to4.
Databases
In this tab, you have to set the location of two databases:
XL-Whois Database: This database is the one created by XL-Whois
while you're using it. It resolves an ISP from an IP address.
GeoIP Database: This database is the GeoLite City that comes from Maxmind. It resolves GeoIP data from an IP address. To get this database and updates, you should
follow these instructions:
Download the GeoIP update tool and install it
in the default directory (C:\ProgramData\MaxMind\GeoIPUpdate\).
Get a license key from your Maxmind account,
download the config file (GeoIP.conf), copy it to the default directory (C:\ProgramData\MaxMind\GeoIPUpdate\) and create
a "GeoIP" subfolder.
Execute the command line tool (geoipupdate.exe).
Create an automated task with Task Scheduler on Windows to update the database regularly.
If you are using other tools from the XL-Toolkit, XL-ParseMails will try to find those databases when the program starts.